Mexican elote (corn) salad
If you’ve been to Mexico or Central America or even San Antonio Texas, you may have seen corn on the cob that has been covered in something that looked like mayonnaise and various reddish spices at street food vendors. Frankly, as someone that grew up in the north with fresh sweet corn, I always turned my nose up at mexican elote (corn). Why mess with perfection?
In case you are curious, Mexicans and Central Americans call corn “Elote” when it’s on the cob. Once it’s off the cob and dried and ready to be made into tortilla, it’s then called maize.
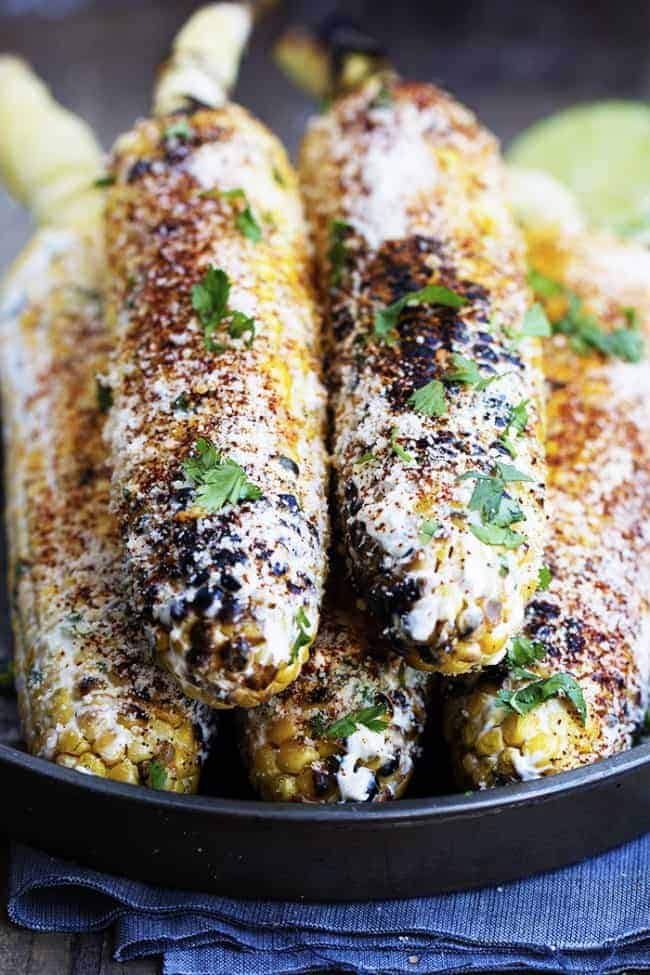
Mexican Street corn
Once I tasted this in San Antonio, I repented and this is a delish side that serves well warm or cold. I served elote as a salad because it’s easier to eat as a salad than off the cob.
This recipe has been modified from a recipe I found on yummly.com https://www.yummly.com/recipe/Elote-Salad-1776002
Ingredients
Dressing/Sauce:
- 1/3cup Mexican crema (Yummy recommended Créme Fraîche – but seriously french creme for a mexican dish?…. <eye roll>)
- Juice from 1 lime (I used 2 tablespoon of lime juice)
- 1/4 teaspoon ancho chile powder (hint — it’s found in the spice rack area)
- 1 pinch cayenne pepper
- salt to taste
Corn:
- 7 ears of corn
- 2 tablespoons small-diced red onion
- 2 serrano peppers (optional, thinly sliced)
- 1 handful cilantro (chopped into smaller pieces for taste and looks. Don’t over chop)
- 2 tablespoons queso fresco crumbled
- 1/4 teaspoon ancho chile pepper (I substituted chile lime pepper)
Directions:
Make the sauce by mixing the mexican crema, lime juice, ancho chili powder, and cayenne pepper in a small bowl. Taste and salt enough to get the flavors to come out. Don’t over salt!
Shuck your corn and grill while turning occasionally until the kernels are slightly charred. Cool until you can handle and cut the corn off the cob into a larger bowl.
Mix the diced red onion, and peppers with the corn. Mix about half the cilantro into the corn and mix evenly.
Add the sauce into the corn mixture until all of the corn kernels are evenly coated. Sprinkle with chile lime or ancho chile pepper to taste.
Top with the remaining cilantro and the crumbled queso fresco for garnish.

Thai chicken satay sandwiches
It’s been 3 years since I’ve added a recipe to my blog. I guess life got in the way and I also found myself remaking the existing recipes over and over again. Why stop a good thing?
I finally found a recipe worthy of my blog. I love Thai chicken satay and I love Vietnamese sandwiches — you know the ones with a undetermined meat with crunchy cucumbers, carrots, etc. on a crunchy French roll? And every bite includes the crunchiness of the bread and the cucumbers? Well this recipe is the fusion of chicken satay with peanut sauce as a sandwich. They are easy to make and taste amazing.
I modified this recipe from http://shesimmers.com/ specifically shesimmers website
This is a pretty flexible recipe. The sauce is what makes it. Experiment with different breads. I also make the vegetarian version by skipping the chicken and adding additional cucumbers and tomatoes and then drizzling with sauce. Left over sauce can be refrigerated and warmed up later.
makes about 12 sandwiches
Ingredients:
Peanut sauce
- 1- 13.5 oz. can of fat-free unsweetened coconut milk
- 2 oz. of Thai curry. I used green curry but red curry works well too.
- 3/4 cup natural creamy peanut butter.
- 1 tsp salt
- 3/4 cup sugar
- 2 TBLS white or apple cider vinegar
- 1/2 cup water
- Chicken marinade
- 1/3 cup cream of coconut
- 2 TBLS ground turmeric
- 1/2 tsp pepper
- 1 clove garlic minced clove
- 1 tsp ground coriander Note – I don’t think the marinade makes much difference. The oily marinade will help put some nice grill lines on the chicken. I used some stir fry sauce and pepper for the marinade once and and some Thai peanut sauce for the marinade once. Both with good results. Go figure. The point is don’t let the
- 1.5 lbs. of boneless chicken thighs (thighs are softer and fattier which are better than breast meat)
- French rolls or ciabatta – really anything that is crunchy on the outside and chewy inside.
- 1 cucumber sliced very thin
- 2 tomatoes sliced very thin
- enough cilantro to garnish
- Sandwich fixings
Directions:
Make the rub and marinate chicken: Mix cream of coconut, turmeric, pepper, garlic, coriander together. Coat the chicken and place in a container in the fridge for several hours.
Prepare the peanut sauce: Add all of the ingredients for the sauce into a medium pan and bring to a boil. Stir often to avoid scorching. Boil for a few minutes and then let simmer for 3-5 minutes to thicken the sauce. Let the sauce cool while you cook the chicken.
Grill chicken: remove the chicken from the marinade and grill until done. The fat of the chicken and the marinade will make for some flare-ups so be prepared with a squirt bottle to knock down flare-ups. Remove chicken from the grill, slice up and set aside.
Construct sandwich: Slice the bread in half but leave one side intact (like a hinge). Toast in oven under high broil for a few minutes. This takes 3-5 minutes.
Place chicken slices, sliced cucumbers, sliced tomatoes, and cilantro on the toasted bread, drizzle with lots of peanut sauce and enjoy warm.
Enjoy!

Maple Glazed baby back ribs
Continuing my ribs of summer, I found and modified this maple glazed rib recipe. My family and neighbors loved them and so will you if you like sweet side of ribs. The maple flavoring provided a hint of sweet maple flavor but it wasn’t overpowering.
These ribs are pretty easy to make. I made half my ribs with a smoker and half the ribs with my grill and they were both tasty. The ribs from the smoker were more tender. The grilled ribs were more chewy/crispy but had slightly more maple flavoring in the meat probably because of the multiple glazings.
Have fun!
Ingredients
Rub
- 3 racks of baby back pork ribs
- 2 TBLS. turbinado sugar (looks like dry brown sugar)
- 1 TBLS. dry mustard
- 2 tsp. kosher or sea salt
- 1 tsp. ground black pepper
- 1 tsp. dried sage
- Maple Glaze
- 1 cup maple syrup
- 3 TBLS. ketchup
- 2 TBLS Worcestershire sauce
- 1 TBLS. Dijon mustard
- 1 TBLS. apple cider vinegar
- 1/2 cup turbinado sugar
Directions
Make the rub: Mix sugar, mustard, salt, pepper and sage in a bowl. Break up any clumps.
Prepare the ribs: Remove the membrane from the bone side of the ribs with a clean wash cloth that lets you grip and carefully pull off the membrane.
Cover all sides of the ribs with the rub. Place the ribs in a non reactive container. I buy vacuum packed ribs so I can put the ribs back into the plastic vacuum packing. Refrigerate overnight.
Make the glaze: In a medium sauce pan, combine all of the ingredients and cook over medium heat while whisking so the mixture doesn’t burn. Bring to a boil, then reduce the heat to simmer for 5-10 minutes until the mixture is thicker and syrupy. To test this I would remove some glaze with a spoon and cool so I could see how thick it was. The idea is that you want it to be thicker than maple syrup so it will coat the ribs and stick rather than pour off the sides. Think the thickness of BBQ sauce. Save the glaze until cooking time.
Grilling the ribs: Clean and oil your grate. The ribs will stick if you don’t! Prepare the grill for indirect cooking. I placed foil under the half of the grill I was going to place the ribs to catch the drippings. I turned the other side of the grill on high. I placed water soaked wood chips on the hot side to create smoke. I added new chips ever 15 minutes.
I cooked the ribs for 45 minutes on the indirect heat side starting with the bone side down. After 45 minutes, I brushed glaze on both sides and turned the ribs over. I then reglazed and turned the ribs over ever 15 minutes. Over time the meat will shrink off the the bones by 1/4 inch or so.
After the final glazing, I placed the ribs on the hot side of the grill for a few minutes to braise the glaze onto the ribs. WATCH THESE AND DON’T WALK AWAY. It only take a few minutes for the glaze to get bubbly and seconds to go from glaze to black nasty charcoal.
Smoking the ribs: I smoked the ribs at 225F for 4 hours using cherry wood. At 4 hours, I removed the ribs, packed them in foil with a generous coating of maple glaze and put them back on the heat for an hour.
After this I removed the ribs from the foil, put them on a hot grill. Reapplied more glaze and cooked over direct heat for a few minutes to braise the glaze onto the ribs like the grilling instructions.

Smoked Ribs….

Grilled Ribs
tomato coleslaw
My sister-in-law makes this coleslaw and I love it. The tomato really adds flavor to normally boring coleslaw.
Ingredients
- 1 bag coleslaw mix
- half onion (diced)
- 2 tomatoes (diced)
- 1/4 cup mayonnaise
- salt and pepper to taste
Directions
Mix everything up and serve!

Citrus mojo marinated ribs with pineapple BBQ sauce
There are a couple of camps for ribs. Sweet sugar based ribs or salty savory ribs. They both have a place on your menu. This recipe is a citrus based marinade that really comes out in the ribs. Add pineapple BBQ sauce and you have a winner. This recipe takes a while to make but it’s worth it.
The Pineapple BBQ sauce provides sweet, smoky heat to the ribs or anything for that matter. I think it’s a winner.
Ingredients for marinade for 2 racks
- 1/3 cup extra virgin olive oil
- 6 cloves of garlic minced
- 1/2 onion chopped
- 1-1/2 cup orange juice
- 1/2 cup lime juice
- 1 tsp. salt
- 1 tsp. ground oregano
- 1 tsp. ground cumin
- 1 tsp. ground pepper
- 3 TBLS chopped fresh cilantro
- 2 racks baby back pork ribs
Make the marinade
heat the oil in a heavy sauce pan over medium heat. When the oil is hot, add the onion, garlic and cook until browned which will take under 5 minutes. Add the orange juice and lime juice and bring to a boil for 60 seconds. Add the salt, pepper, oregano, cumin, and cilantro and boil for another 60 seconds. Let the marinade cool to room temperature and then puree in a blender.
Prep the ribs:
Remove the membrane on the bone side of the ribs. I use a clean washcloth so I can get a grip on the membrane and slowly pull it off.
Set aside 1/4 of the marinade for later basting.
Use 3/4 of the marinade and coat the ribs and place in a non-reactive container. You will want to be able to turn the ribs every few hours to keep things well coated. Marinate in the fridge for 12-24 hours. The citrus will help break down the tissue so the longer the better. I generally start marinating around 5pm the previous day and then start to cook the ribs around 8am.
I like to buy vacuum packed ribs because I can slice the end off prepare the ribs and then carefully put the ribs back in the plastic vacuum pack.
Smoke the ribs:
Prepare your smoker. I use apple wood chips or other fruit wood when I’m making sweet ribs. Smoke at 225-250F for 4-5 hours.
Remove from smoker, baste the ribs with the unused marinade, wrap in foil and return to the smoker. This is the step that makes the meat fall off the bone. Leave in smoker another hour.
Optional step – braise the ribs with sauce:
Some people like to heat up their grill, brush on the BBQ sauce and braise the sauce to the ribs. Be careful – The purpose of this step is only to bind the sauce to the ribs. If you aren’t watching, the tomato and sugar base of the BBQ sauce burn very quickly.
I usually cut the ribs into 1-2 rib sections, place them in a big bowl, pour on BBQ sauce and stir the ribs to make sure everything is well coated and serve.
Make the Pineapple BBQ sauce:
Ingredients for Pineapple BBQ sauce – makes 3 cups
- 1 TBLS. vegetable oil
- 1/4 onion chopped
- 1/4 green pepper chopped
- 2 cloves garlic chopped
- 1TBLS. chopped ginger
- 1/4 – 1 habanero pepper chopped
- 3/4 cup diced pineapple with juice
- 1/4 cup pineapple juice
- 2 1TBLS. apricot preserves
- 3.4 cup canned tomato sauce
- 1/2 cup ketchup
- 3 TBLS. Worcestershire sauce
- 1 TBLS. molasses
- 1 TBLS. spicy mustard
- 3 TBLS brown sugar
- 1 tsp. chile powder
- 1/4 tsp. ground allspice
- 3 TBLS. chopped cilantro
- 1 tsp. liquid smoke
Directions:
Heat the oil in a sauce pan over medium heat. Add the onion, pepper, garlic, ginger and habanero. (careful handling the habanero. The oil will stick to your fingers and you will burn your eyes if you touch them). Stir and cook until everything is well browned.
Stir in the diced pineapple, pineapple juice and apricot and cook until the mixture boils for a few minutes.
Add tomato sauce, ketchup, lime, juice, Worcestershire sauce, molasses, mustard, brown sugar, chile powder, and allspice. Bring to a boil again. Reduce the heat and simmer for 10 minutes.
Let the sauce cool to room temperature. Add the cilantro and liquid smoke. Puree in blender and store in refrigerator.

Chocolate peanut butter cup ice cream
If the thought of silky-smooth chocolate-ly peanut butter ice cream loaded with peanut butter cups sounds good to you, then this recipe is for you. Be warned that this ice cream is rich and anything more than a scoop will send you into a heavenly sugar coma.
My company thought this was fantastic.
Ingredients
- 1/4 cup sugar
- 3 eggs
- 1-1/2 cup half and half
- 1 cup milk chocolate chips
- 3/4 cup sweetened condensed milk
- 3/4 cup peanut butter
- 5 peanut butter cups, chopped
Directions
Prepare the mixture: Beat the eggs and the sugar together for about 3 minutes until they are thick.
Mix the half and half, sweetened condensed milk and chocolate chips in a saucepan and bring to a simmer over low heat while stirring continuously until the chips are completely melted.
Slowly add the chocolate mixture to the egg-sugar mixture while whisking as to not cook the egg mixture. Once you have everything added, pour everything back into the saucepan. Cook over low heat until the mixture is thick enough to coat the back of a spoon. Do not boil.
Remove the mixture from the heat and add the peanut butter. Refrigerate the mixture until it is well chilled. This is important for the creaminess factor.
Freeze the ice cream: Freeze the ice cream according to the directions of your ice cream freezer. Add the chopped peanut butter cups after the ice cream starts to set up. Place the ice cream into a container and place in the freezer so the ice cream can set up.
Enjoy.

Grilled pound cake. Quick. Easy. Delicious.
Here’s a quick and easy dessert for a cookout that is easy to do, looks impressive and tastes great. there are lots of ways to modify this dessert. Consider using different flavors of cream cheese or pudding in the middle.
Ingredients
- Sliced pound cake. (frozen or whatever. I found pre-sliced pound cake at Sam’s Club)
- Softened Cream cheese spread with pineapple chunks.
- Whipped cream (I used the whipped cream from the can)
- Berries of your choice
Directions
Prepare: Lay the pound cake out on a sheet. Spread a thick layer of cream cheese on one side. Place the other pound cake layer on top and it’s ready to grill.
Grill: Heat the grill on high and get the grill really hot. The purpose is to create those nice looking grill lines in a few minutes which makes everything taste better. Watch closely because the pound cake will burn before your realize it and burnt pound cake is no good. turn over and grill the other side. You only need to grill for 2-5 minutes on each side depending on your grill.
Remove from the grill, add whipped cream and garnish with berries. I cut mine in half to make more servings for the kids. There were no left overs!
Enjoy.

Key lime pie ice cream— good enough to be on your bucket list
If you have a bucket list and you like key lime pie, this recipe needs to be on it.
I had a weekend BBQ this past Saturday and I decided to create some new recipes. I love good key lime pie and I love ice cream. Why not have both? This recipe turned out fabulous and a huge hit with my friends. I almost didn’t want to share it with my friends when I tasted how good it was. You will get the tart and sweetness of the key limes. You will get the cold creamy texture of the ice cream. And you get chunks of graham cracker to add texture. It’s wonderful.
Ingredients
- 2 cups whole milk
- 2/3 cup key lime juice. (I use Nellie and Joe’s)
- 1/8 tsp. salt
- zest from 1 lime
- 14 oz can sweetened condensed milk
- 5 graham crackers smashed into chunks
Directions
Prepare the mixture: Mix the milk, key lime juice, salt, lime zest, and condensed milk. Chill in refrigerator for at least an hour. I have learned that chilling the mixture is the secret to making the ice cream creamier. I think it’s because the mixture freezes at a more consistent rate.
Freeze the ice cream: Freeze the ice cream according to the directions of your ice cream freezer. Add the graham crackers after the ice cream starts to set up. Place the ice cream into a container and place in the freezer so the ice cream can set up.
Enjoy.

Grilled Pork Loin that isn’t dry…
Pork Loin is generally inexpensive and can make a good meal if you know what to do with it. In the past I’ve shied away from grilling pork loins because they come out really dry and they don’t like to absorb flavor. However, as I was walking through Sam’s Club, the $1.39/lb for pork loin called out to me to repent and try again with this misaligned cut of pork. This time it would be different. Inside of dry, I would marinade it with something that would keep it from being dry.
It was different. This is the best pork loin I’ve ever grilled. This recipe has a lot of sweet and sour to it. The lime and honey really stick out in the finished product. My company all agreed that this belonged on the blog. This is a great recipe for a more refined meal with nice sides. This isn’t a meal to compete with a outdoor BBQ with ribs and burger. Good luck! I think I will next modify the recipe and use a true brine and smoke and see how that turns out.
Ingredients
- 1-2 lb Pork Loin. (I bought a 5 lb loin and cut it in to thirds)
- 1 limes zested.
- 1/2 cup lime juice. (I used key lime juice since that’s what I had)
- 1/4 cup honey
- 1-1/2 tsp. salt
- 1/2 tsp. garlic powder
- 1 chipotle chile peppers in adobo sauce (I used an entire small can that I found in the Mexican section)
- 1/3 cup vegetable oil
- 1 TBLS chopped fresh cilantro leaves
Directions
Prepare the meat: Remove extra fat. Trim all the silver skin off. I used a needle tenderizer to poke holes in the meat to help flavor get to the center of the meat.
Make the web rub: Mix the lime zest, honey, salt, garlic powder. Save 2/3s of the rub for grilling and after grilling.
Marinate the meat: Use half of the wet rub to coat the meat. Add chipotle pepper. I put 1 section of loin in a 1 gallon ziplock bag and put into the refrigerator. Marinate for at least 8 hours. I would highly recommend 24 hours. turn it over several times to get everything even.
Cook the Meat: Make sure the meat is out of the fridge for 30 minutes before cooking to warm up. This will make cooking more even. Cold meat tends to leave huge differences in doneness between the center and the outside of the meat – generally not good!
Take the wet rub that you set aside earlier and split into 2 parts. The first part will be used as a mopping sauce during grilling. The second part will be used after grilling so don’t contaminate with raw meat.
Add the vegetable oil to the wet rub that you are going to use for mopping. mix well.
Set your grill on as high. Wipe the grill down with vegetable oil since the meat will tend to stick to the grill. Lightly mop the meat with the wet rub and grill the meat on each side for 10 minutes per side to sear each side of the tenderloin. Turn the grill down to medium and alternate turning the meat ever every 10 minutes and brushing on more rub. You may need to oil the grates if the meat starts to stick. Use a thermometer and cook to a center temp of 140F.
Take the loin off the grill, wrap in foil, and pour the remainder marinade onto loin and cover.
Slice into thin pieces. Garish with cilantro.

Key Lime Blueberry pie = Heaven
I’ve always been a huge fan of key lime pie. but if you add some blueberries to the picture you get something amazing that is up there with chocolate and peanut butter. Imagine the tartness of key lime and then in every bite having a juicy plump blueberry to contrast with the lime. See? Your mouth is watering already.
Here’s how to make it.
Ingredients
- 9 inch graham cracker crust
- 1/2 cup key lime juice. (I use Nellie and Joe’s)
- 3 egg yolks
- 14 oz can sweetened condensed milk
- 1/2 cup blueberries
- 8 oz cool whip
Directions
Mix the condensed milk, egg yolks, key lime juice. Blend well until smooth. Add the blueberries.
Pour into the pie crust and baker at 350F for 10 minutes. Allow the pie to cool for 10 minutes and the refrigerate. Add whipped topping and garnish with lime slices before serving.


